
Contents
– Step 1: Choose your paper
– Step 2: Choose a ribbon
– Step 3: Add a decorative element
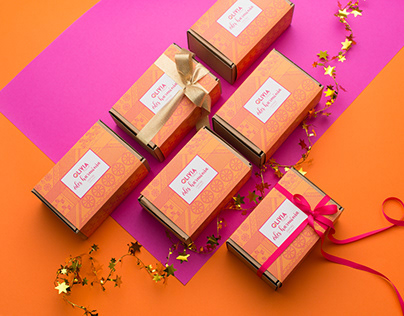
Personalizing a gift package is a double pleasure for the recipient and a special touch. Let your creativity run wild and design a gift package full of fantasy by following these tips!
Materials needed to personalize a gift package.
Cardboard
Paper scissors
Cutter
String
Masking tape
1. Choose your paper
It isn’t easy to personalize a package with a traditional patterned gift wrap.
Choose plain paper, especially kraft paper.
Economical and trendy, kraft paper comes in plain, but also in white, black, all the rainbow colours, and even gold. You can use it as is or decorate it:
– With a stamp (e.g. initial letter of the recipient’s first name) and white or coloured ink.
– With masking tape:
◦ simple strips of masking tape juxtaposed or crisscrossed;
◦ patterns cut from masking tape: pennants, lozenges… ;
◦ or even patterns “drawn” with masking tape: Christmas tree, birthday candles…
Use printed paper with stripes or dots.
– With striped paper, play the graphic style.
– With a polka dot paper, make packages full of fantasy.
Tip: With the small round eraser passed over a white or coloured inker, turn plain paper into polka dot paper.
Use tissue paper
Tissue paper is excellent as an “underlay”: first, wrap your gift in coloured tissue paper, then wrap it in a more neutral paper (black, white, beige, gold) in which you have punched one or more patterns with a cutter or pattern punch.
Think about fabric
Collect fabric scraps to add an unusual touch to your gift packages. For example, layer a wide strip of printed fabric on a paper-wrapped box and tie it with a simple string.
2. Choose a ribbon
Below are a few ideas to help you out:
– Fabric ribbon: ribbon in a contrasting colour on your paper or tone on tone, or multiple ribbons in different colours, for a multi-coloured effect. You can also weave the ribbons flat on the package instead of trying them.
– Simple beige or white twine:
◦ as-is for very plain or streamlined packages;
◦ or on which you will string decorative elements: beads, buttons…
– Baker twine (twisted twine in 2 colours).
– Strands of wool.
– A long strip is torn from the fabric.
– Or no ribbon or string at all: let the tag take center stage, attached with a piece of masking tape.
3. Add a decorative element
Personalize your packages with a variety of cut-out, fabricated or nature-harvested elements. These can be:
– Flat decorative elements:
◦ Natural leaves, feathers…
◦ Giant letter (recipient’s initial) cut from cardboard.
◦ Garlands of pennants, stars, hearts…
◦ Felt or cardboard patterns cut out by yourself (fish, bird, heart, leaves, clouds…), glued on the package or threaded on the ribbon or string.
◦ Magic wand made with a paper star and a toothpick, etc.
– Embossed decorative elements:
◦ Large wool pom-pom or 3 different coloured pom-poms.
◦ Miniature windmill.
◦ Fresh flowers.
◦ Items gleaned from nature: fir or eucalyptus sprigs, rosemary or lavender sprigs, red berries, acorns, small pine cones…
Note: You can bomber in gold elements gleaned from nature for a Christmas package.
Hope this post has delighted you. Our blog is incomplete without your participation—humble request to share your opinion about it in the comments below. You can also share your ideas to bring exciting new experiences to our readers. It will indeed help all of us to personalize our gift boxes!
Thanks for your posting on this website. From my experience, there are times when softening upward a photograph could possibly provide the photographer with a dose of an artsy flare. Often times however, the soft blur isn’t what exactly you had at heart and can frequently spoil an otherwise good snapshot, especially if you thinking about enlarging them.
Pingback: 3 Steps for Making Birthday Decorations – Home And Events